How to Create an IAM Access Role and Attach to an EC2 Instance with AWS CLI
Let’s go through the process of creating an IAM role with read only permissions to IAM resources, and attaching that role to an EC2 instance. Screenshots for key steps are included.
Prerequisites:
- AWS CLI configured on your local system
- An existing EC2 instance to attach the IAM role to
Step 1 – Create IAM role
Use your favorite text editor and create the file “ec2-trust-policy.json” with the content below:
{
    "Version": "2012-10-17",
    "Statement": [
        {
            "Effect": "Allow",
            "Action": [
                "sts:AssumeRole"
            ],
            "Principal": {
                "Service": [
                    "ec2.amazonaws.com"
                ]
            }
        }
    ]
}
Use the create-role command to create a role called “myIAMAdminRole” and allow EC2 instances to assume it:
aws iam create-role --role-name myIAMAdminRole --assume-role-policy-document file://ec2-trust-policy.json
Step 2 – Attach IAM Managed Policy
Next we’ll attach the IAM Read Only Access managed policy using the attach-role-policy command:
aws iam attach-role-policy --role-name myIAMAdminRole --policy-arn arn:aws:iam::aws:policy/IAMReadOnlyAccess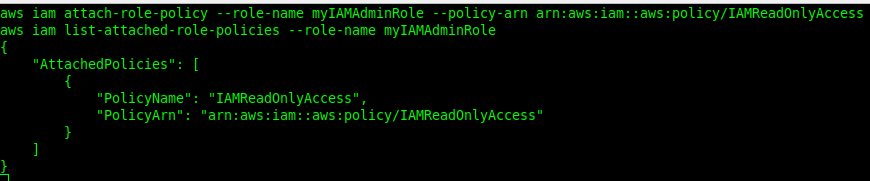
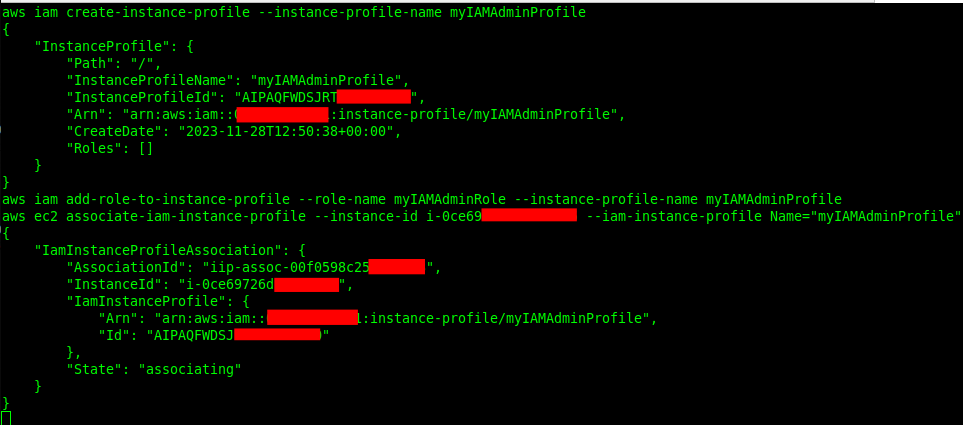
Step 3 – Create & Associate Instance Profile
Now we need to create an instance profile and associate it with our EC2 instance:
aws iam create-instance-profile --instance-profile-name myIAMAdminProfile

aws iam add-role-to-instance-profile --role-name myIAMAdminRole --instance-profile-name myIAMAdminProfile

aws ec2 associate-iam-instance-profile --instance-id i-0afxxxxx123 --iam-instance-profile Name="myIAMAdminProfile"
Note: Make sure to substitute “i-0afxxxxx123″ for the appropriate ec2 instance ID in your environment.
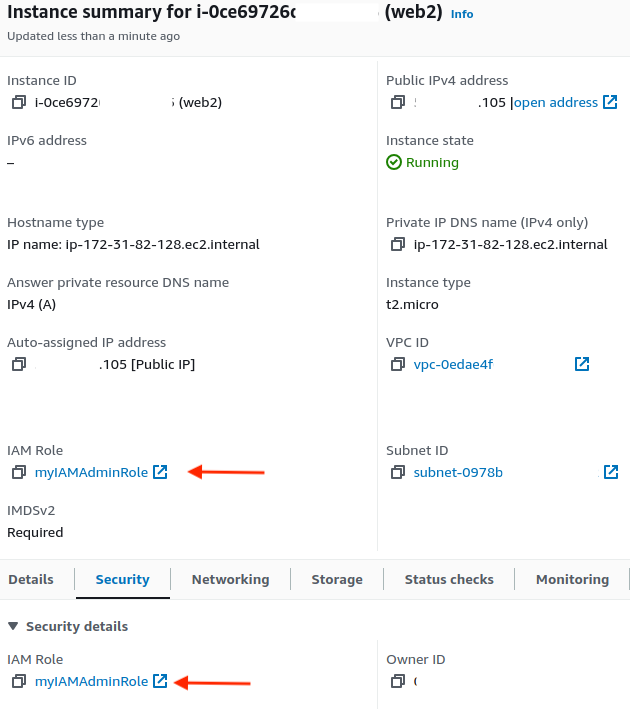
Confirm Attachment
Finally, we can validate that the IAM role is now attached in the AWS Console:
If you have any questions or require assistance, we are actively seeking strategic partnerships and would welcome the opportunity to collaborate. Don’t hesitate to contact us!