VM Import/Export to AWS
By: Willio Jean Paul
Overview
This will take you to the steps to create a copy of an on-premises server on AWS as an Amazon Elastic Compute Cloud (EC2) instance. We will use the AWS Command Line Interface (AWS CLI) to run a VM Import/Export job. Upon completion, a copy of the server is created as an Amazon Machine Image (AMI) and uploaded to an Amazon Simple Storage Service (Amazon S3) bucket.
Tasks Outline
- Follow the guidelines to Prepare Your VM
- Install the AWS CLI and configure credentials
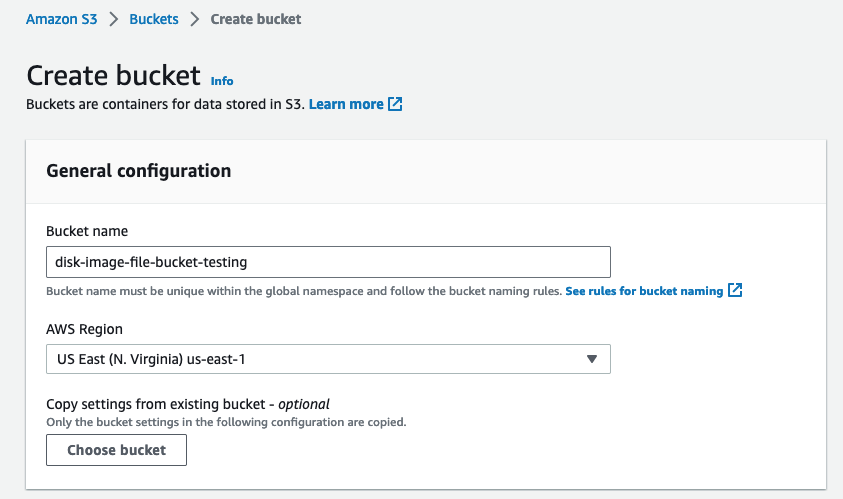
- Create a new S3 bucket in the same AWS region where you will run the EC2 instance
- Create an IAM role named “vmimport” with trust policy trust-policy.json that allows the VM import service to assume the role.
4.1. Create the file “trust-policy.json” with the content below using your favorite text editor:{
"Version": "2012-10-17",
"Statement":[
{
"Effect": "Allow",
"Principal": { "Service": "vmie.amazonaws.com" },
"Action": "sts:AssumeRole",
"Condition": {
"StringEquals":{
"sts:Externalid": "vmimport"
}
}
}
]}
4.2. Create the role using the aws cli command below:aws iam create-role --role-name vmimport --assume-role-policy-document “file://trust-policy.json" - Attach the following IAM policy named “vmimport” to the IAM role to grant permissions.
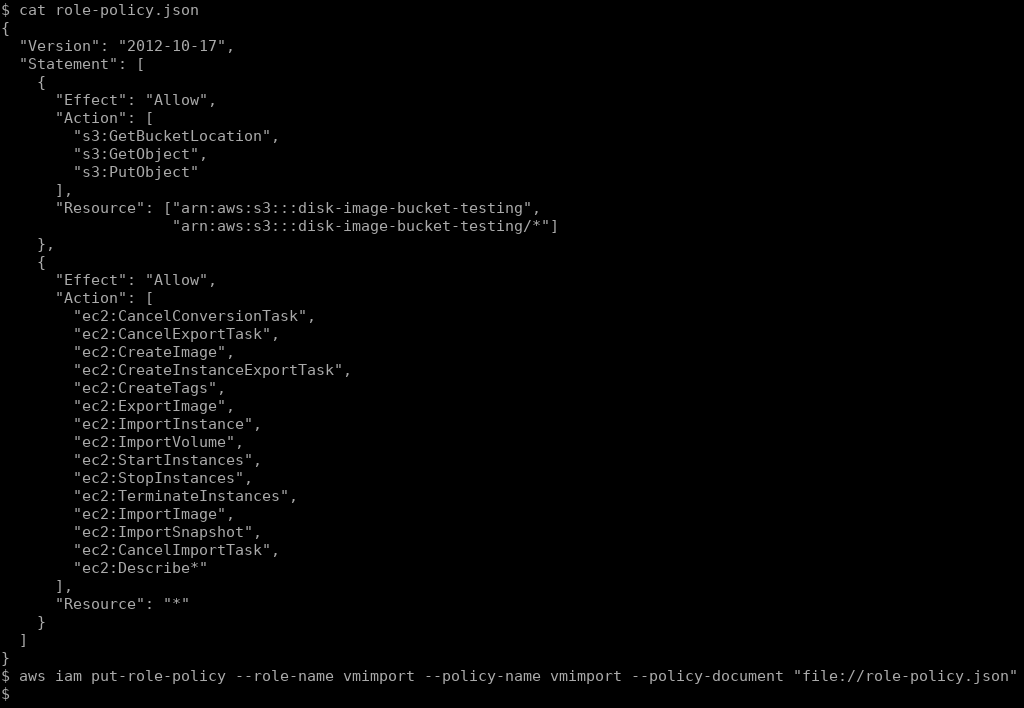
5.1. Create the file “role-policy.json” with the content below using your favorite text editor:{
"Version": "2012-10-17",
"Statement": [
{
"Effect": "Allow",
"Action": [
"s3:GetBucketLocation",
"s3:GetObject",
"s3:PutObject"
],
"Resource": ["arn:aws:s3:::disk-image-bucket-testing",
"arn:aws:s3:::disk-image-bucket-testing/*"]
},
{
"Effect": "Allow",
"Action": [
"ec2:CancelConversionTask",
"ec2:CancelExportTask",
"ec2:CreateImage",
"ec2:CreateInstanceExportTask",
"ec2:CreateTags",
"ec2:ExportImage",
"ec2:ImportInstance",
"ec2:ImportVolume",
"ec2:StartInstances",
"ec2:StopInstances",
"ec2:TerminateInstances",
"ec2:ImportImage",
"ec2:ImportSnapshot",
"ec2:CancelImportTask",
"ec2:Describe*"
],
"Resource": "*"
}
]}
5.2. Attach the policy using the aws cli command below:aws iam put-role-policy --role-name vmimport --policy-name vmimport --policy-document “file://role-policy.json” - Upload the image to the S3 bucket using the aws cli command:
aws s3 cp SIFT-Workstation.ova s3://disk-image-file-bucket-testing/
Confirm that the image has been uploaded successfully by using the listing commandaws s3 ls s3://disk-image-file-bucket-testing/ - From the client machine, create the file “containers.json” and run the AWS CLI command import-image to start the import.
7.1. Create the file “containers.json” with the content below using your favorite text editor:[
{
"Description": "SIFT Workstation OVA",
"Format": "ova",
"UserBucket": {
"S3Bucket": "disk-image-file-bucket-testing",
"S3Key": "sift-workstation.ova"
}
}]
7.2 . Run the aws command to import the imageaws ec2 import-image --description “SIFT Workstation OVA - $(date)”” --disk-containers file://containers.json - To check the import task status, run the AWS CLI command describe-import-image-tasks.
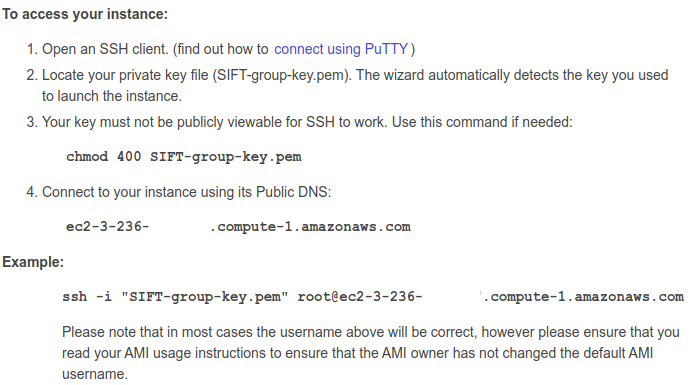
aws ec2 describe-import-image-tasks --import-task-ids import-ami-0d34054c26c9b342c - After the image is imported as an AMI, follow the instructions for Launching Your Instance from an AMI.


Reference:
- VM Import/Export Requirements: https://docs.aws.amazon.com/vm-import/latest/userguide/vmie_prereqs.html
- Required Permission for IAM Users: https://docs.aws.amazon.com/vm-import/latest/userguide/vmie_prereqs.html#iam-permissions-image
- Import Your VM as an Image: https://docs.aws.amazon.com/vm-import/latest/userguide/vmimport-image-import.html#import-vm-image
- Creating an IAM User in Your AWS Account: https://docs.aws.amazon.com/IAM/latest/UserGuide/id_users_create.html
- Access Keys (Access Key ID and Secret Access Key): https://docs.aws.amazon.com/general/latest/gr/aws-sec-cred-types.html#access-keys-and-secret-access-keys
- Amazon Machine Images (AMI): https://docs.aws.amazon.com/AWSEC2/latest/UserGuide/AMIs.html